How to Add Animation to a React Native App
By the Charmotion team · Updated
To add animation to a React Native app, use the built-in Animated API with useNativeDriver: true for simple UI motion, and Reanimated for gesture-driven or complex motion. Add lottie-react-native for designer-made vector loops, @rive-app/react-native for interactive characters, and react-native-video for clips.
Key takeaways
useNativeDriver: truemoves anAnimatedanimation to the UI thread.- Reanimated 4 works only on the New Architecture and needs
react-native-worklets. - Rive's Nitro runtime needs React Native 0.78+, Expo SDK 53+, iOS 15.1+ and Android SDK 24+.
- Rive state changes go through data binding hooks such as
useRiveNumberanduseRiveTrigger. - Check
AccessibilityInfo.isReduceMotionEnabled()before starting loops.
Already have a character or logo? Preview your own character animated in a phone splash, a website hero and an empty state — free, in your browser, nothing uploaded.
Animated API or Reanimated: which should you use?
React Native ships the Animated API. It is enough for fades, slides and simple springs, and it needs no extra dependency. Reanimated, from Software Mansion, is the common choice for gesture-driven motion, layout animations and anything that must stay smooth while JavaScript is busy.
Here is the rest of the toolbox:
| You want to animate | Use |
|---|---|
| Simple UI feedback | Animated with useNativeDriver: true |
| Gestures, complex sequences | Reanimated |
| A designer-made vector loop | lottie-react-native |
| A character that reacts to app events | @rive-app/react-native |
| A fixed, pre-rendered clip | react-native-video |
A Reanimated spring looks like this:
import Animated, { useSharedValue, useAnimatedStyle, withSpring } from "react-native-reanimated";

function Bouncy() {
  const scale = useSharedValue(1);
  const style = useAnimatedStyle(() => ({ transform: [{ scale: scale.value }] }));
  return (
    <Pressable onPressIn={() => (scale.value = withSpring(0.92))}
               onPressOut={() => (scale.value = withSpring(1))}>
      <Animated.View style={[styles.card, style]} />
    </Pressable>
  );
}
Reanimated 4 works only with the New Architecture (Fabric) and requires react-native-worklets. Older apps on the legacy architecture need to migrate first or stay on an earlier Reanimated version.
What does useNativeDriver actually do?
Without the native driver, JavaScript computes every frame and sends it across to native code. If the JS thread is busy, say parsing a large response, frames drop. With useNativeDriver: true, React Native sends the whole animation to native code once, and it runs on the UI thread without going through JavaScript on every frame.
const opacity = useRef(new Animated.Value(0)).current;

useEffect(() => {
  Animated.timing(opacity, {
    toValue: 1,
    duration: 300,
    useNativeDriver: true,
  }).start();
}, []);

return <Animated.View style={{ opacity }}>{children}</Animated.View>;
The native driver supports non-layout properties such as opacity and transform. Animating width, height or margins needs the JS driver, which is a good reason to express motion as scale and translation instead.
This is also the core idea behind Reanimated: worklets run animation logic on the UI thread, so gestures and springs stay smooth even when your JavaScript is not.
How do you add a Lottie animation in Expo or bare React Native?
Install lottie-react-native. In a bare project, run pod install in the ios folder afterward; in Expo, use npx expo install lottie-react-native so the version matches your SDK. Check the README's requirements first: the current major targets recent React Native versions on the New Architecture, and the 7.3.x line exists for older versions.
import LottieView from "lottie-react-native";

export function Loading() {
  return (
    <LottieView
      source={require("./assets/loading.json")}
      style={{ width: 160, height: 160 }}
      autoPlay
      loop
    />
  );
}
Give the view explicit dimensions, as the README's example does. For React Native Web, the package also needs @lottiefiles/dotlottie-react.
Lottie is a good fit for spinners, success checks and onboarding illustrations. If the animation must change behavior based on app state, a Rive state machine is easier than swapping Lottie files.
How do you add a Rive character with the Nitro runtime?
Rive's current React Native runtime is built on Nitro Modules. Install it with its peer dependency; with Expo, use npx expo install and a development build, since it contains native code:
npm install @rive-app/react-native react-native-nitro-modulesIt requires React Native 0.78+ (0.79+ recommended), Expo SDK 53+, iOS 15.1+ and Android SDK 24+. The older rive-react-native package is legacy.
Load the file with useRiveFile, create a view model instance, and bind properties with hooks:
import { RiveView, useRiveFile, useViewModelInstance, useRiveNumber, useRiveTrigger } from "@rive-app/react-native";

export function Mascot({ loading }: { loading: boolean }) {
  const { riveFile } = useRiveFile(require("./assets/character.riv"));
  const { instance } = useViewModelInstance(riveFile, { async: true, viewModelName: "Character" });
  const { setValue: setMood } = useRiveNumber("mood", instance);
  const { trigger: success } = useRiveTrigger("success", instance);

  useEffect(() => { setMood(loading ? 5 : 0); }, [loading]);

  if (!riveFile) return null;
  return (
    <RiveView
      file={riveFile}
      stateMachineName="CharacterViewModelMachine"
      dataBind={instance}
      autoPlay={true}
      style={{ width: 220, height: 220 }}
    />
  );
}
Call success() when an action completes. Rive's docs recommend async: true and note that you may need playIfNeeded() on the view ref after changing properties if the state machine has settled. State machine input methods are deprecated in this runtime; see Rive on React Native for the migration timeline.
How do you play a muted, looping video?
For a fixed clip, use react-native-video. Version 6 requires iOS 13 or later, and a v7 is in beta. A muted loop needs three props:
import Video from "react-native-video";

<Video
  source={require("./assets/logo-reveal.mp4")}
  style={{ width: 240, height: 240 }}
  resizeMode="contain"
  repeat
  muted
/>
Video is the right tool for photographic or 3D clips, such as a launch reveal or a marketing loop. It cannot react to app state, and each variation adds another file to your bundle. For a character that has to idle, wait and celebrate, one Rive file with a state machine is usually smaller and far more flexible.
Pause video when the screen loses focus, for example with React Navigation's focus events, so it does not keep decoding in the background.
Lottie, Rive or video: which is lightest in React Native?
Each option has two costs: the runtime library you add once, and the files you ship for each animation.
- Video needs
react-native-video, and every clip is a separate file. Size grows with resolution, length and the number of variations. - Lottie adds the Lottie native libraries. Files are JSON, so a simple vector loop is small, but complex After Effects exports with many layers can grow quickly.
- Rive adds its native runtime. Rive lists the iOS runtime at about 1.67 MB download and the Android ARM-v8a runtime at 2.40 MB download (January 2026). After that, each
.rivis a compact binary that can hold every state of a character.
The trade-off flips as you add states. One decorative loop on one screen is often lightest as a short video or a Lottie file. A mascot with idle, loading, success, error and talking states would need five videos or five Lottie files with hard cuts between them, while one Rive file covers all of them with smooth transitions.
Whatever you choose, measure the real numbers: check your release bundle size before and after adding the library, and compare file sizes for your own artwork rather than relying on vendor examples.
How do you add an onboarding mascot or character?
Decide the mascot's states from your app's events, not from the artwork. A typical mapping:
- Onboarding step appears: fire
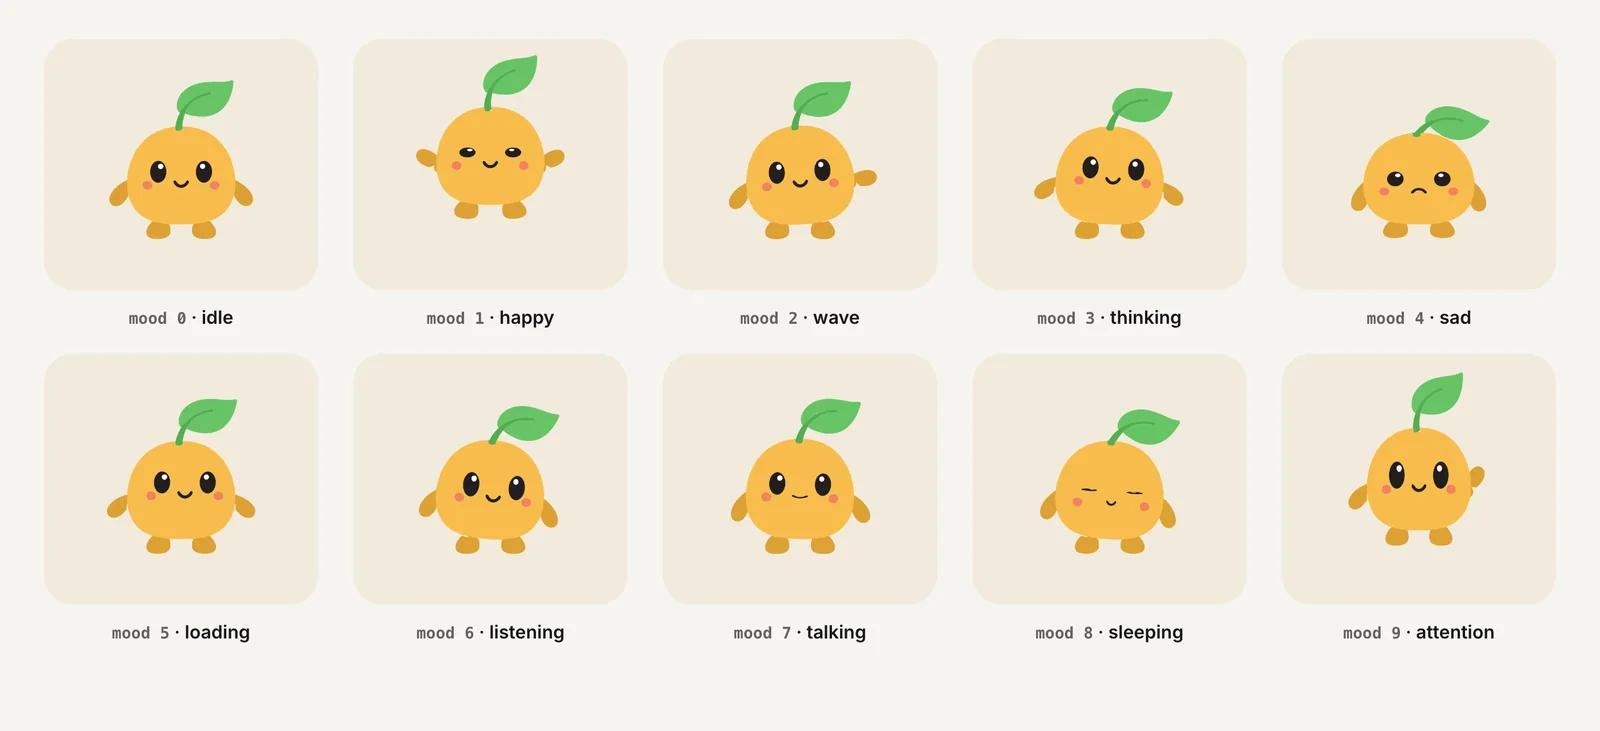
enter, then idle. - Waiting on the network: a loading loop (mood 5).
- Permission granted or task done: fire
success. Failure: fireerror. - Voice input: listening; reply playing: talking.
Keep this mapping in one hook, such as useMascot(state), that sets the mood and fires triggers. Screens pass their state; the Rive state machine handles transitions so reactions finish cleanly.
Charmotion generates this kind of file from an uploaded mascot or logo: a .riv with CharacterViewModelMachine and a Character view model (a mood number from 0 to 9 and triggers such as success, error, enter and exit), which matches the Nitro code above. See mascot animation states for planning.
How do you keep React Native animations smooth and accessible?
Keep animation work off the JavaScript thread:
- Use
useNativeDriver: trueor Reanimated worklets, and animatetransformandopacity. - Unmount or pause loops, Lottie views and videos on screens that are not focused.
- Bundle animation files with the app instead of fetching them on first view.
- Test release builds on a real low-end Android device; dev mode is slower.
Respect reduce motion. AccessibilityInfo.isReduceMotionEnabled() resolves to true when the setting is on, and the reduceMotionChanged event fires when it changes. On Android it also reports true when the transition animation scale is set to off.
const [reduce, setReduce] = useState(false);

useEffect(() => {
  AccessibilityInfo.isReduceMotionEnabled().then(setReduce);
  const sub = AccessibilityInfo.addEventListener("reduceMotionChanged", setReduce);
  return () => sub.remove();
}, []);

return reduce ? <Image source={require("./assets/mascot-still.png")} /> : <Mascot loading={loading} />;
Keep the meaning in text when you remove motion. See the reduced motion guide for WCAG details.
Add animation to a React Native app
- Use built-ins first. Animate
opacityandtransformwithAnimatedanduseNativeDriver: true. - Add Reanimated for gestures. Install Reanimated and
react-native-worklets; version 4 requires the New Architecture. - Add a runtime for art. Install
lottie-react-native, or@rive-app/react-nativewithreact-native-nitro-modules(an Expo development build). - Render the file. Use
<LottieView source autoPlay loop />oruseRiveFilewith<RiveView file={riveFile} />. - Bind app state. Create a view model instance and drive it with
useRiveNumberanduseRiveTrigger. - Respect reduce motion. Check
AccessibilityInfo.isReduceMotionEnabled()and show a still image when it is true.
Frequently asked questions
Does Reanimated 4 require the New Architecture?
Yes. Software Mansion's docs state that Reanimated 4.x works only with the React Native New Architecture (Fabric), and it requires the react-native-worklets package. If your app still runs on the legacy architecture, migrate first or stay on an earlier Reanimated major version until you can.
Can I use Rive in Expo Go?
No. Rive's React Native runtime includes native code through Nitro Modules, so it cannot run inside the standard Expo Go app. Use an Expo development build (Expo SDK 53 or later) or a bare React Native project, then install @rive-app/react-native and react-native-nitro-modules.
Is rive-react-native deprecated?
Rive now treats rive-react-native as the legacy runtime and directs new projects to the Nitro-based @rive-app/react-native. Existing apps can keep running on the old package for now, but new features and data binding work target the new runtime, so plan a migration.
Should I use Animated or Reanimated for a simple fade?
The built-in Animated API is enough. Use Animated.timing with useNativeDriver: true so the fade runs on the UI thread. Reach for Reanimated when motion follows a gesture, chains several steps, or must stay smooth while the JavaScript thread is busy with other work.
Quick answers from this guide
Sources
- Animated — React Native
- Reanimated: Getting started — Software Mansion
- lottie-react-native — lottie-react-native (GitHub)
- React Native runtime — Rive
- React Native runtime: Data binding — Rive
- react-native-video v6 installation — TheWidlarzGroup
- AccessibilityInfo — React Native