How to Add Animation to a React or Next.js App
By the Charmotion team · Updated
To add animation in React, install motion and import motion from "motion/react" for component transitions, use CSS for simple effects, DotLottieReact for Lottie files, and useRive for an interactive character. In Next.js, any component that animates in the browser must be a client component.
Key takeaways
- Framer Motion is now Motion:
npm install motion, then import from"motion/react". AnimatePresencelets elements animate out before React removes them.<MotionConfig reducedMotion="user">follows the visitor's reduce-motion setting.- Use
@lottiefiles/dotlottie-reactfor Lottie anduseRivefor state-driven characters. - In the App Router, start animating components with
"use client".
Already have a character or logo? Preview your own character animated in a phone splash, a website hero and an empty state — free, in your browser, nothing uploaded.
Is Framer Motion now called Motion?
Yes. The library formerly published as framer-motion is now Motion, an independent project. Its upgrade guide is short: uninstall the old package, install motion, and change the import path.
npm uninstall framer-motion
npm install motion
// before
import { motion } from "framer-motion";
// after
import { motion } from "motion/react";The component API is the same, so existing motion.div code keeps working after the import change. Tutorials written before the rename still apply; just read framer-motion as motion/react.
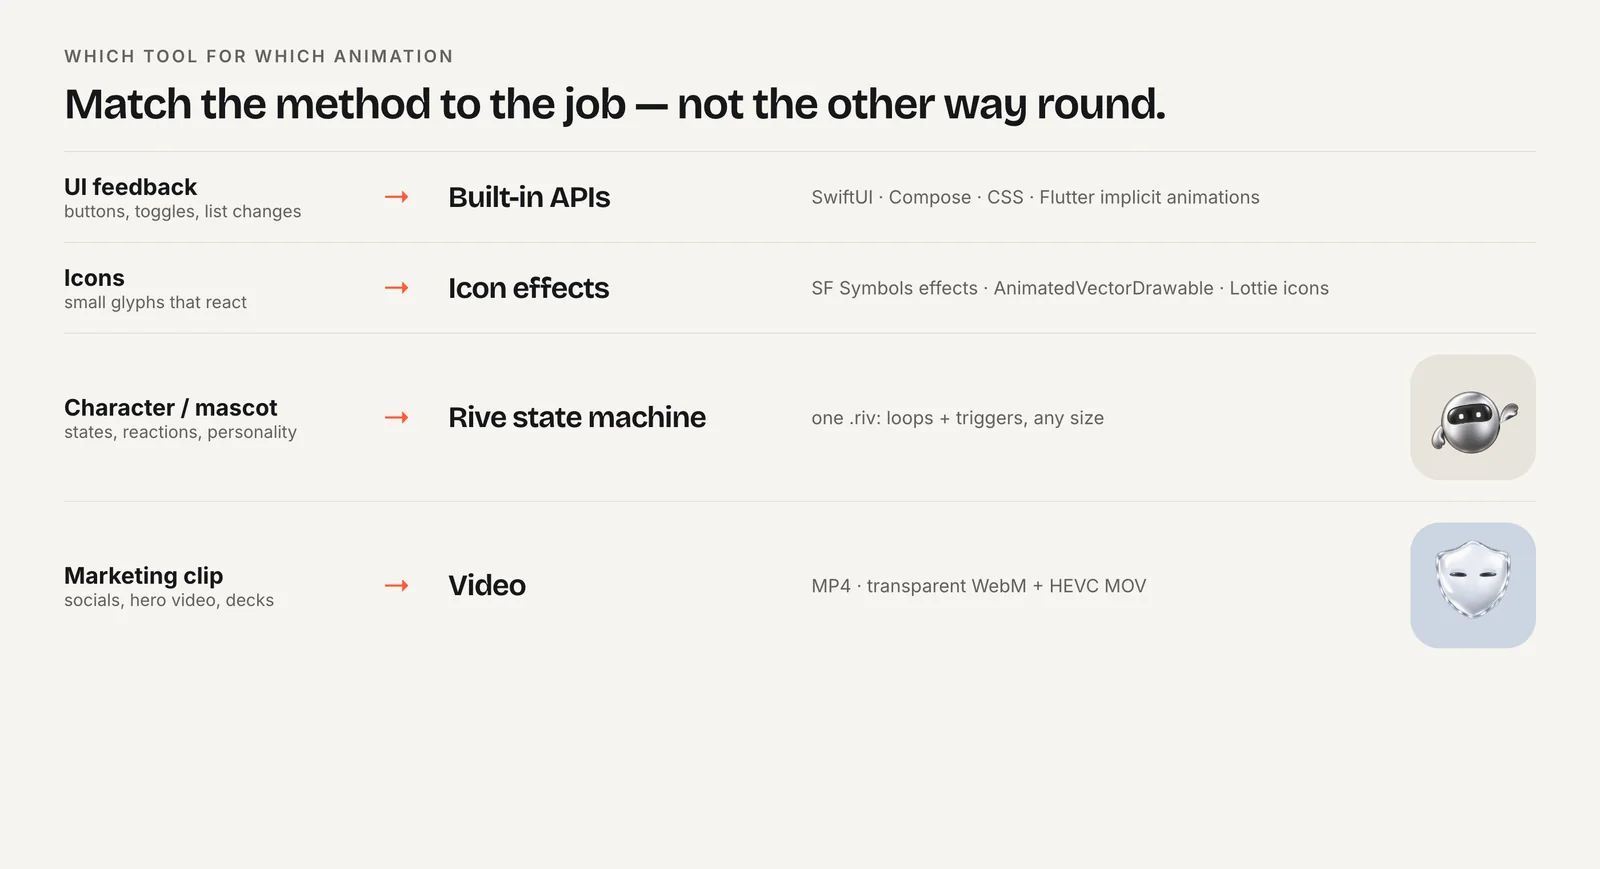
Motion is a good default for interface animation in React: entering and leaving elements, layout changes, gestures and shared-element transitions. It is not the right tool for a drawn illustration or a mascot, which come from a design tool as a file. For those, use Lottie or Rive, covered below.
How do you animate a component with Motion?
Replace an element with its motion counterpart and describe the start and end states. Wrap conditional elements in AnimatePresence so they can play an exit animation before unmounting.
import { AnimatePresence, MotionConfig, motion } from "motion/react";

export function Toast({ open, message }: { open: boolean; message: string }) {
  return (
    <MotionConfig reducedMotion="user">
      <AnimatePresence>
        {open && (
          <motion.div
            key="toast"
            role="status"
            initial={{ opacity: 0, y: 12 }}
            animate={{ opacity: 1, y: 0 }}
            exit={{ opacity: 0, y: 12 }}
            transition={{ duration: 0.2 }}
          >
            {message}
          </motion.div>
        )}
      </AnimatePresence>
    </MotionConfig>
  );
}
Each child of AnimatePresence needs a stable key. With reducedMotion="user", Motion disables transform and layout animations when the visitor has reduce motion turned on, while opacity and color changes still run. That is usually the behavior you want. For finer control, the useReducedMotion() hook returns a boolean you can branch on. Put MotionConfig once near the root of your app rather than in every component.
When is plain CSS enough in React?
Often. Hover effects, focus rings, spinners and simple fades do not need a library. A CSS module or Tailwind class with a transition costs no JavaScript, and it runs even before React hydrates.
/* Button.module.css */
.button { transition: transform 150ms ease-out; }
.button:active { transform: scale(0.97); }

@media (prefers-reduced-motion: reduce) {
  .button { transition: none; }
}
Reach for Motion when CSS gets awkward:
- an element must animate out before React removes it;
- a layout change (list reorder, expanding card) should animate smoothly;
- values come from state, gestures or scroll position;
- several animations must run in sequence.
A sensible split is CSS for micro-interactions, Motion for component choreography, and an animation file for anything an illustrator drew. Keeping the three separate also keeps your bundle small: pages that only use CSS never load Motion at all.
How do you add a Lottie file in React?
Install LottieFiles' React player and render it with a path to a .lottie or .json file:
npm install @lottiefiles/dotlottie-reactimport { DotLottieReact } from "@lottiefiles/dotlottie-react";
export function EmptyState() {
return (
<DotLottieReact
src="/animations/empty-inbox.lottie"
loop
autoplay
style={{ width: 240, height: 240 }}
/>
);
}DotLottieReact renders a canvas and accepts canvas props such as style and className. For custom playback controls, its dotLottieRefCallback prop hands you the underlying player instance, which has play, pause and seek methods. The component comes from the same dotlottie-web project as the plain web player, so files behave the same in React and on static pages.
Lottie works well for illustrations that play straight through: empty states, onboarding scenes, confetti. If the animation needs to react to app state, such as switching from loading to success, consider a file built around a state machine instead.
How do you add an animated character with states?
Use Rive's React runtime. useRive loads the file and returns a RiveComponent to render; with autoBind: true, the view model hooks give you setters for the file's properties. Rive recommends @rive-app/react-webgl2 for most projects, and @rive-app/react-canvas has the same API.
import { useEffect } from "react";
import {
  useRive,
  useViewModelInstanceNumber,
  useViewModelInstanceTrigger,
} from "@rive-app/react-canvas";

type Status = "idle" | "loading" | "done";

export function Mascot({ status }: { status: Status }) {
  const { rive, RiveComponent } = useRive({
    src: "/mascot.riv",
    stateMachine: "CharacterViewModelMachine",
    autoplay: true,
    autoBind: true,
  });
  const vmi = rive?.viewModelInstance;
  const { setValue: setMood } = useViewModelInstanceNumber("mood", vmi);
  const { trigger: success } = useViewModelInstanceTrigger("success", vmi);

  useEffect(() => {
    if (status === "loading") setMood?.(5);
    if (status === "done") { success?.(); setMood?.(0); }
  }, [status, setMood, success]);

  return (
    <div style={{ width: 200, height: 200 }}>
      <RiveComponent aria-label="Assistant mascot" />
    </div>
  );
}Drive the character from props, never during render, and size the wrapper rather than the canvas. Charmotion generates this kind of file from an uploaded character, mascot or logo, along with ready-made React code; the Rive in React guide covers the input-based API and every package option in depth.
How do you avoid SSR and hydration issues in Next.js?
In the App Router, components are server components by default, and server components cannot use hooks, browser APIs or event handlers. Any file that calls useRive, renders DotLottieReact or uses Motion with state should start with the "use client" directive:
"use client";

import { Mascot } from "./Mascot";
export default Mascot;
Keep the client boundary small. Make the animated widget a client component and import it into an otherwise server-rendered page, so only that widget ships JavaScript.
If a library touches window at import time and still fails during prerendering, load it only in the browser with next/dynamic:
"use client";
import dynamic from "next/dynamic";

const Mascot = dynamic(() => import("./Mascot").then((m) => m.Mascot), {
  ssr: false,
  loading: () => <div style={{ width: 200, height: 200 }} />,
});
The placeholder keeps the layout from shifting while the runtime loads. In the Pages Router the same dynamic(..., { ssr: false }) pattern applies, without the directive.
How to add an animated character to a Next.js page
- Install the runtime. Run
npm install @rive-app/react-canvas(or@rive-app/react-webgl2) and put the .riv inpublic/. - Create a client component. Start the file with
"use client"and calluseRivewith the file, the state machine name,autoplayandautoBind: true. - Get the setters. Use
useViewModelInstanceNumberfor the mood anduseViewModelInstanceTriggerfor one-shot reactions. - Map app state to the character. In a
useEffect, set the mood or fire a trigger whenever your status prop changes. - Render and size it. Render
RiveComponentinside a wrapper with a fixed width and height, and import the component into your server page.
Frequently asked questions
Should I still install framer-motion?
No. New projects should install motion and import from "motion/react". Existing projects can switch by uninstalling framer-motion, installing motion and updating import paths; Motion's upgrade guide shows the component API is unchanged, so existing motion.div code keeps working after the import update.
Why do I get "window is not defined" in Next.js?
A browser-only library ran on the server. Add "use client" to the component that uses it, and if the error persists, import that component with next/dynamic and ssr: false so it loads only in the browser. Give the dynamic import a sized placeholder so the layout does not shift.
Lottie or Rive for a React app?
Use Lottie for illustrations that play straight through, such as empty states or onboarding scenes. Use Rive when a character must switch between states in response to app events, because one state machine file replaces several separate animations and their switching logic. Many apps use both: Lottie for scenes, Rive for the mascot.
How do I respect reduced motion in React?
Wrap your app in <MotionConfig reducedMotion="user"> for Motion animations, add prefers-reduced-motion media queries to CSS, and use useReducedMotion() or matchMedia to pause Lottie and Rive players or show a static frame. Test it by turning on the reduce motion setting in your operating system.
Quick answers from this guide
Sources
- Upgrade guide: framer-motion to motion — Motion
- React accessibility: reduced motion — Motion
- dotlottie-web: players for web, React, Vue, Svelte and web components — LottieFiles on GitHub
- React runtime — Rive
- Canvas vs WebGL — Rive
- use client directive — Next.js
- prefers-reduced-motion — MDN Web Docs